.png)
Create Impactful Visuals
- Patina Jackson, MT-BC
- Aug 5, 2024
- 6 min read
Honestly, I think it's where the first spark was lit for Music Therapy Joy.
As a new music therapist in my hunt for existing resources for working with students in special education, I found HUNDREDS of fantastic songs - but no visuals (or only a few dated visuals) to go along with them. And HUNDREDS of fantastic visuals with no songs to go along with them.

Why visuals? Having these supports adds a critical visual (and tactile!) layer to multi-sensory learning, supports memory and recall, organizes concepts, creates opportunities for non-verbal interaction and more!
My parents both have art/design degrees, so I've always loved design of all kinds. AND I am passionate about writing quality, meaningful songs to play, learn and grow for kids and teens. So, creating beautiful, quality visuals, that I could use to support goals through music, felt like home!
You can find most of the songs + visuals throughout this post in my shop! But they are ALL (read: HUNDREDS of songs + visuals) available in my Music Therapy Joy Community Resource Library - an exclusive benefit for community members! Learn more, here!
But, you don't have to be an artist to create impactful visuals for students! And sometimes, you just need to make something that's a custom fit for your unique students!


Keep reading for...
Tips to keep in mind from the start!
Canva hacks that help! (including a FREE TEMPLATE LINK to create your own!)
Tricks to make your design beautiful!
Tools to take your visual from design to print!
You have a great song to play, learn or grow! Now what?
Tips to Start Strong
Identify the role that the visual will play and the goals that it will address:
a book to practice reading, story, sight words, or "wh" questions?
a file folder with velcro pieces for students to identify, match, count or order?
an envelope filled with picture cards to identify or reference?


Consider
Age (I tend toward cute, simple, graphics for littles, and stock photos for bigs (although, photos work for the littles too)! I also love using artistic graphics think watercolor that can go younger or older!)


Preference (if they like dinosaurs, my counting song will count dinos!)

Vision needs (high contrast or enlarged graphics for low vision)
Once you've identified the goal, style of visual and individual considerations, it's time to get creating!
I LOVE Canva and have used it for YEARS. It has incredible functionality, beautiful graphics, and some key tools that save me HOURS!
Creating a Visual in Canva

You can use Canva for free, upgrade to Pro (I LOVE the pro account for access to more graphics and features - it's worth every penny and more), OR sign up with your school email address to get Pro FREE!! Once you're in:
Choose a custom design size (when I'm working on printables I'm selecting 8.5x11, either portrait or landscape, that can be printed on standard letter size paper).
Choose fonts (I have a few favorite fonts that I use consistently. It saves me so much time, and makes the visuals predictable for students - see if you notice on all the demo pictures of my visuals below!)

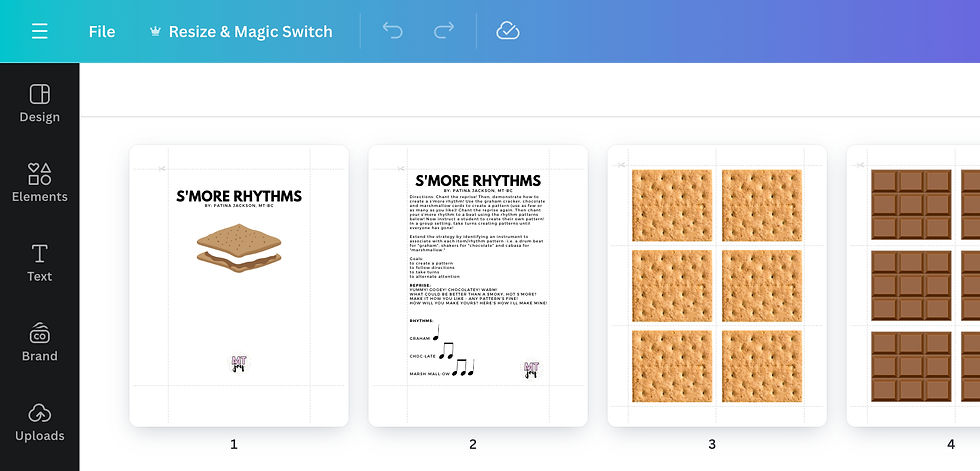
Choose graphics (use tools like background remover and color editing options to create a clean, distraction-free look!) Click through the photo thumbnails below to see how it works!


Bonus: if you create a printable and want a print-free presentation version to go with it, try Magic Resize to instantly copy and resize your design for sharing on a tablet or classroom screen!

Tricks for Beautiful Graphics
Now, having the most stunning visuals IS NOT the primary goal. But I believe children and teens are worthy of our BEST work, whatever that looks like for each of us. In the same way I desire to create beautiful, quality music with and for children; I want to create beautiful, quality visuals!
Here are some tricks to take your visuals to the next level!
Color. consider a pleasing, consistent color palette. Many of the graphics available in Canva allow you to change the colors! I regularly swap out colors to make them easier on the eyes! I use these same colors for text as well!


Scale. I love an oversized graphic. Not only does it support low vision, or ease of use in a large group, I also love the way it looks! You'll often see my graphics hanging off the page (Like in "I Spy" or the oak tree in "10 Little Acorns" below). And if one graphic is larger, I make sure to keep the scale consistent across the document.


Alignment. Canva has rulers and margin cues so you can keep consistent margins and spacing for a cohesive visual! I often hit the "duplicate" button for a page, and simply replace the text and graphic with the new!
Style. If I'm using a watercolor style graphic, then I use ALL watercolor/texture style graphics for that visual. Stock photos? I'll use photos throughout! The "see more like this" feature when searching for elements also lets you find graphics that were made in a set!
When your design is finally complete, you're ready to...
Take Your Visual from Design to Print
Creating a Book
When creating a book, I print on card stock to keep it durable and long-lasting! This includes the book pages themselves, as well as any pieces I may velcro on for matching, etc.! I typically also print the last page 2-sided with the description so that the song lyrics and suggestions are on the back cover for easy reference.


I laminate everything with my personal laminator and 3 or 5 mil lamination sheets. Cut out and velcro any pieces in their correct places!
I bind with my FAVORITE binding machine and binding combs, but you can also use a hole punch and metal ring to hold your book together!
Creating a File Folder
When creating a file folder visual, I print the cover page and description page on standard paper and glue them to the front and back of the folder. If the inside has a background, I print that on standard paper and glue to the inside of the folder.


Similar to the book, I print any removable pieces on card stock for durability!
My machine isn't large enough to laminate a file folder, so I run it to my local office store. They can usually do it in a few minutes while I wait! If you are at a school or district with access to a large laminator, don't be shy! Ask to use it!
Once you've laminated the file folder and pieces, just velcro them on using velcro dots!
Creating an Envelope
A large envelope (I use 9x12 or 6x9 - depending on the size of the pieces stored inside) provides a way to easily access the visual with a cover page on the front, and a way reference the suggestions and lyrics with the description page on the back. PLUS it provides storage for your visual cards or pieces! See some examples from my shop, below!!


Print the cover page and description page on standard paper and glue to the front and back of the envelope (for a 6x9, design the cover page size accordingly to be cut out and glued on the smaller sized envelope - you can see the faint cut lines in the visual below!).
Laminate the envelope (using the large menu sized laminating sleeves) and any cards/pieces. Cut a slit in the envelope to open it. Cut out and store the cards/pieces inside!
(Check out all of my favorite printable supplies on Amazon, here *as an Amazon affiliate, I may receive earnings on qualifying purchases - but I'm really just sharing them in hopes that it makes your life easier!)
Looking for More Resources (that you DON'T have to make)?
If you want resources like these at the click of a button, visit my shop OR join our community for HUNDREDS of songs and visuals, join the MTJ Community for exclusive access to my resource library! Learn more, here!
And, as promised, I am sharing a FREE canva template below to create your OWN printable book! Just follow the link and select "Use Template for New Design"! You can then edit away! Happy creating!!
Comentários